Showing posts with label How To. Show all posts

Tuesday, September 28, 2010

Getting The Most Fall Color Out Of Your Pictures

With a little know-how, colorful fall pictures can be made even better.

Well, for those of us living in the Northern Hemisphere, it's been fall for almost a week now. For those of us living in certain areas of the world, fall means colorful foliage.

So how to get the most out of your fall pictures?

For one thing, shoot your camera using the RAW format. Yes, JPEG allows for some color-related editing, but with RAW, the number of ways to tweak the colors increases dramatically, as does the ease of doing so. Yes, RAW mandates post-processing, but in the end, many people who are serious about their digital pictures will agree with me that RAW rules.

AUTHOR'S NOTE :For the examples and screen shots that follow, I am using Canon's Digital Photo Professional (DPP) RAW editing software that came bundled with my EOS 30D. If you shoot something else, your RAW editor will be different, but the overall functions should remain the same.

Onto making your colors “pop.”

First thing: Examine the picture
This is a lot easier if you just came in from a shoot. Chances are, upon opening the picture, you will notice that the colors in rthe picture probably aren't as vibrant as you remember them.

Option 1: Boost Saturation
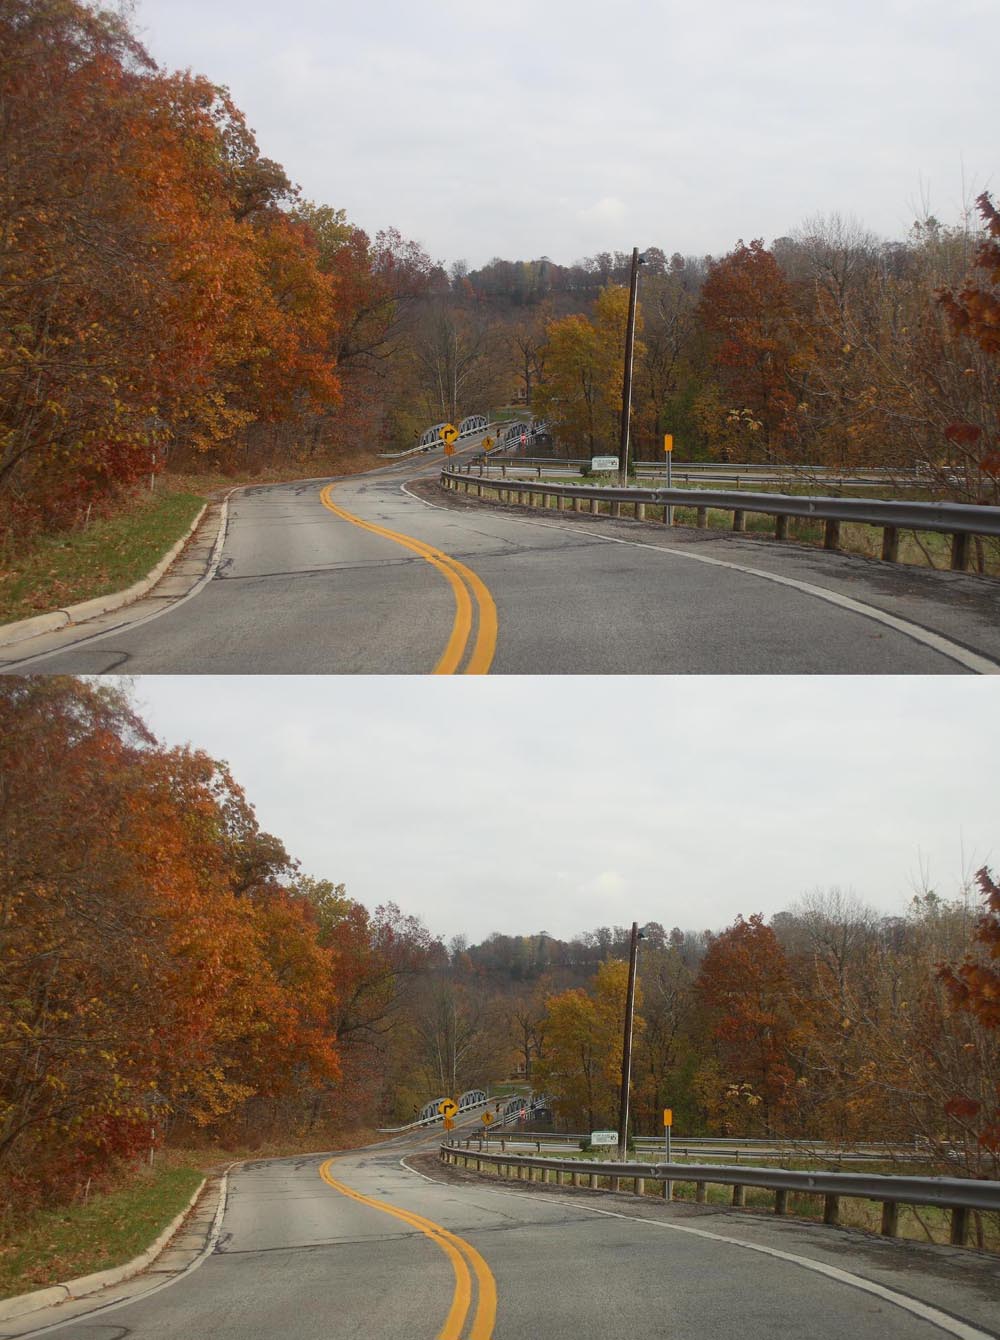
By far the simplest operation, boosting the saturation is simply what one can do in Photoshop or the like. Simply find your saturation controller and kick it up a few notches. On DPP, I can take my 30D 4 steps up (increasing saturation) or 4 down (decreasing saturation). In my opinion, a setting of +2 works best as the change is noticeable, but the picture sill looks like a picture, not a painting.


Option 2: Adjust white balance
The reason I love RAW so much is that, should you mess up the white balance setting when shooting, there's no worry, you can just go back and fix it later on the computer. True, when one thinks of white balance, one usually thinks of major mistakes,, such as shooting tungsten under daylight. However, more subtle mistakes can kill your colors. Just by clicking on the correct white balance setting for the conditions in which the picture was shot can help render more vibrant, accurate colors.



Option 3: Picture styles
Besides white balance, picture styles can have a major impact on color rendition. Obviously for fall scenery, the landscape setting is the best. However, for anyone who demands the greatest accuracy, the setting that is an exact recording of color, 'faithful' in DPP, is another option.


Option 4: Dynamic range histogram
On DPP, there is a histogram function. While not directly impacting color, the way it plays with the light and dark will have an impact on how color looks. On DPP, moving left will lighten the lights. For color, this will often lead to a loss of saturation, but a generally brighter picture. Moving right will create a darker image, but one that appears more saturated in color.


Option 5: Any combination of the above
While each of the above four techniques can help boost color in your photos when applied correctly, try using any two or even all of them together, one can really add some fantastic colors to fall photos.


Like What You Just Read?

Why not check out other great stuff about photography, astronomy, associated gear, and how to use it.

Think someone else would find this informative (or at least entertaining)? Use the buttons below to share!


Thursday, September 16, 2010

Easy Polar Alignment In The Daytime

For any non-astrophotographer who has stopped by this website and taken a look at my astrophoto galleries, one big question may come to mind: "how does he do that?"

Well, a lot goes into capturing those stunning astrophotos and I'll probably touch on these factors at some point in the future. Today, I'll talk about the most crucial aspect of getting good astrophotos through a telescope: good polar alignment (aligning the mount to astronomical North).

Everyone knows that the Earth spins on its axis once a day, that's why the Sun, Moon, and stars appear to rise and set. So, with the celestial objects moving across the sky, it is absolutely crucial to accurately track them to compensate for the Earth's rotation. Any tracking inaccuracy will result in streaked, not perfectly round stars.

So, how does one go about this?

Traditionally, one gets accurate polar alignment through use of a polar scope (pain in the neck) or by using the latest computer-equipped telescope mounts (expensive). At the time I got started, a go-to mount was out of the budget and Polaris was (and still is) blocked by trees.

There had to be another way, and there was.


Step 1: Find Local Noon
Noon isn't noon (unless you live right on a time zone border), sorry. To find when the Sun is directly due South, just google it. To make things easier, here is a place where you can find your local noon:

timeanddate.com


Step 2: Get Prepared
Time of local noon found, wait for it to come, but in the meantime, find something that stands up straight. For me, this stool worked just fine. You'll also need a yardstick and something to write on the ground with.

how to do easy polar alignment of telescope astrophotography

Step 3: Mark the North-South Line
When local noon arrives, set up your object and trace the line of its shadow on the ground


Step 4: Extend the Line
Chances are, the line you draw on the ground won't be long enough to set up a telescope mount, so take the yardstick and extend the line so that it is big enough to cover the spread of your tripod's legs.


Step 5: Setup (in real life, do this at night)

Dark having arrived, haul out your scope and set the North leg of the tripod directly on the line. Next, spread the back legs so that they are about an even distance from the line.


Step 6: Measure

To get accurate alignment, be sure to measure so that the back legs are the exact same distance from the North-South line.

Step 7: Level
Don't forget to check that you are level. An off-level mount will offset perfect polar alignment every time. If you're lucky, your mount will have a built-in level(s) like my Meade LXD-55.


While You're At It . . .
You've made it this far, so why not learn how to attach your camera to a telescope, too?

And For That Matter . . .
If you attach your camera to a telescope, you can also use it as a regular photographic lens!


Step 8: Test
All set up, it's now time to test. Set your camera for 30 seconds and take a few practice shots with the self-timer engaged or with a remote control as vibrations from touching the camera/scope rig can look just like star trailing caused from bad polar alignment.


Author's Note:
I know this isn't the most advanced (it dates from the Stone Age!). method to get accurate polar alignment. However, for people using short focal length scopes (my Orion ED80 is 600mm long) and who are looking to stack short exposures in the realm of 30 seconds to a minute, this method should work every time as it has done for me going on four years now.

Good luck!


Like What You Just Read?

Why not check out other great stuff about photography, astronomy, associated gear, and how to use it.

Think someone else would find this informative (or at least entertaining)? Use the buttons below to share!


Tuesday, July 13, 2010

Fixing Incorrect White Balance In A Few Clicks

For me, the number 1 reason RAW rules is the fact that white balance settings no longer matter. Because the data recorded to the memory card in RAW is just that, raw data, it gives one room to do extra processing that could not be done with an in-camera processed JPEG file. With RAW, just aim, shoot, and fix the white balance later if need be.

Unfortunately, many low-end point and shoot cameras do not offer the RAW option.
The good news is that most cameras work well when set to auto white balance. For natural lighting, the difference between "sunny," "cloudy," "shadow," and "auto" is so minimal that one has to actually look for differences to spot them in most cases. The bad news is that, under artificial lighting, the auto white balance setting ceases to work so well.

Fluorescent lighting is a mixed bag, some cameras do pretty well while others don't do so hot. However, the real Achilles heel of digital cameras is their performance under incandescent/tungsten lighting. To put it plainly, every camera I've ever used (Canon, Nikon, Sony, Olympus) has performed terrible (that's probably too kind a word, but this website is intended to be friendly for all ages) under incandescent lighting. This one fact requires manually setting the white balance from "auto" to "tungsten" when one could leave it alone at all other times.

Enter the problems.

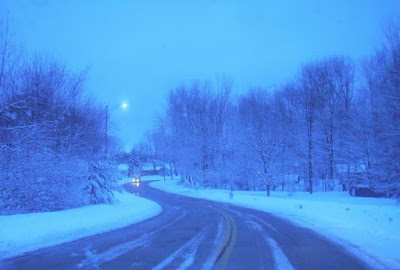
Okay, you're shooting indoors under incandescent lighting one evening. You take the pictures, they look great as you remembered to set the white balance manually, then you go to bed. You get up the next morning and find an eagle sitting in your tree. Quickly, you grab the camera, race to the window, and start snapping before he flies away. The eagle flies away and you decide to review your pictures. Upon review, all of the pictures have an overpowering blue cast to them and look nothing like the scenes you just saw.

Oh #*%^!

Never fear, there is a way to recover your incorrect white balance JPEG images!

All digital cameras (except those picked up at garage sales) come with basic image editing software that allows for the most basic of operations, which typically includes color cast. So, upload your blue pictures and then drop them into your editing software. What follows is a general how-to guide using Photoshop Elements. Your software will probably be different, but the idea remains the same in that the key is changing (sometimes repeatedly) the color cast.

The original image and probably the worst example of a mis-set white balance image that I've shot! Pay attention to the street, there was a definate bluish cast to this morning (hey, I live in Northern Ohio and see snow all the time, so something had to be special!)
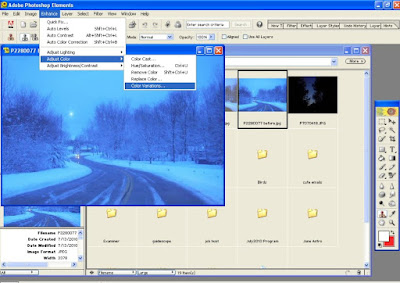
First, opening Elements, go to "enhance" and then to "adjust color." From there, another bar opens to the side, choose "color variations."
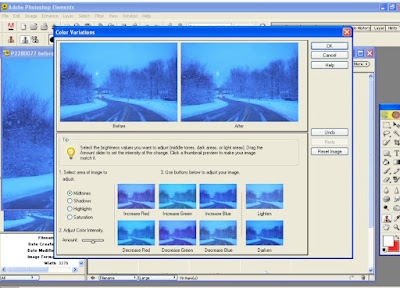
A new window pops up, with the ability to increase/decrease red, green, blue, and brightness.
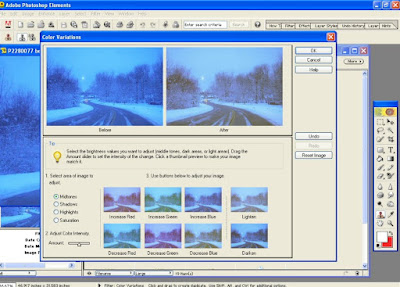
Next (the important part), you adjust your colors. In Elements, this is done with a side-by-side before and after preview screen. Start clicking colors to see your picture change in real time. To fix the white balance, click to reduce blue and add red. Depending on the severity of your incorrect color cast, you may need to reduce blue multiple times. Once you're satisfied with the image, save it.
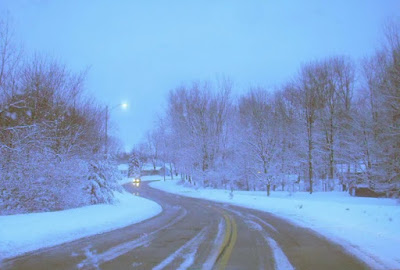
Done, what a difference a few clicks make! (yes, this was a blue morning like this). Again, comapre the street color to that in the original.


Humble requests:

If you found this informative (or at least entertaining), help me pay my bills and check out my Examiner pages for photography and astronomy for more great stuff.

Don't forget to pass this link along, either.

For something even better, become a follower.

Friday, July 9, 2010

"Macro" Photography With A Point And Shoot Camera

Macro photography: extreme close-up shooting that one normally associates with freakishly expensive SLR lenses, fancy lighting rigs, and tiny tripods. In the past, this was the only way to do macro. Today however, things could not be more different.

Many (all but the cheapest) point and shoot digital cameras of today offer a macro mode, which is normally represented by a flower icon. To make things better, most cameras have the macro on/off function as an external button! Yay! Buttons rule! In this macro mode, the camera plays with its lens focus mechanism to allow for super close focus that would be disabled in regular mode. With the ability to focus up close, often aggressive in-camera sharpening, and good light, today's point and shoot cams can make some jaw-dropping photos that will have people exclaiming (as they look at your camera) "you took that picture with that thing!?"

Yes, it can be this good.

With every fine detail mattering in macro photography, especially considering the pixel packed sensors of a P&S camera, good light is vital as it allows one to shoot at base (or near) ISO. At these low sensitivities (I'd avoid anything over 200), a P&S can produce an image that is every bit as good as a dSLR. Unfortunately, even on sunny days, one thing can hinder macro photography: you.

Yes, you are can be your own worst enemy when it comes to shooting macro with the ISO sensitive P&S camera. By having to get close to the subject, you will often block your own light, thus negating your ability to shoot at base ISO. Not good! Instead, if it is absolutely impossible to get out of the way and preserve your desired shooting angle, a small mirror or white piece of paper can be a real picture saver via reflecting light onto your subject once again. real plus of reflected light coming in from the side is that it can amplify any texture on the subject and provide nice contrasts.

Lighting situation conquered, it's time for focus.

P&S cameras focus for macro in two ways: close and then out and out and then in. Generally, the first method is better for macro as the camera automatically focuses at minimum focus distance and then compensates out as needed. By going about focus in this manner, speed and accuracy are both generally better. However, if your camera must focus down from far away even in macro, don't be completely discouraged. Flowers aren't going anywhere nor are any other stationary objects. Bugs may run/fly away but, chances are, if they were easily spooked they wouldn't let you get so close as to think about macro photography in the first place! If you can get to within a foot of an insect, chances are, it's in no hurry to get put of the area.

Whichever way your camera works, getting accurate focus is the biggest challenge to macro photography. To aid in the focus, aim for places of high contrast, such as the edge of a flower petal. With two high contrast objects in the viewfinder, the camera is more likely to find focus correctly.

One last thing about focus, some cameras have an automatic focus for macro mode that doesn't even require you to press the shutter button! This can be a point of controversy. For people used to half pressing the button to focus, the self-operating AF can take some practice to get used to. The good news is that it will get the camera in focus almost instantly due to its continual operation.

The two big hurdles, light and focus addressed, it's pretty much just point and shoot from here as many of today's P&S cameras don't allow for much manual anything anymore. If you are lucky and your camera does allow for manual control, feel free to start playing around with things in your house/yard so that you know what's best when you're out and about. Either way, macro photography with a little pocket P&S can be a lot of fun and rather rewarding once you upload the images to your computer.

Below are a series of images that were all taken with a point and shoot cameras, the Nikon Coolpix s550 and Olympus Stylus 550WP. I must say, while P&S cameras are not my normal cup of tea , this these can be a lot of fun for close-up on the go!

Note: images are resized full shots while second are extremely huge crops. Note where I pulled the crop from against the real picture for scale. Not cropped so heavily, most ofthese photos would make great 8x10" prints.


Postage Stamp


Dollar Bill


Mayfly (aka Canadian Soldier in Northern Ohio)


Model Car, ('66 Olds 442)


An annoying insect


Flower up close


Compact Flash Memory Card


Flower (seriously, I wish I'd wrote down what they were)


#2 Pencil


Hey, be different! Do macro with your P&S!


Like What You Just Read?


Why not check out other great stuff about photography, astronomy, associated gear, and how to use it.

Think someone else would find this informative (or at least entertaining)? Use the buttons below to share!